


はじめに
Convex.devは、モダンなアプリケーション開発者向けに設計されたフルスタックのバックエンド・アズ・ア・サービス(BaaS)です。特に、リアルタイム性とTypeScriptによる型安全な開発を重視している点が大きな特徴です。
Convexの主な特徴
- リアルタイムデータベース: Convexは、データベースの変更をすべての接続中のクライアント(フロントエンド)に自動でリアルタイムに同期します。これにより、リアルタイムなチャットアプリやコラボレーションツールを、WebSocketなどを自分で管理することなく簡単に構築できます。
- TypeScriptによるフルスタック開発: データベースのスキーマ、クエリ、バックエンドのロジック(サーバーレスファンクション)をすべてTypeScriptで記述できます。これにより、フロントエンドからバックエンドまで一貫して型安全な開発が可能になります。
- サーバーレスファンクション: バックエンドのロジックはサーバーレスファンクションとして実行され、データベースに直接アクセスできます。cronジョブや、外部サービス(OpenAI、Stripeなど)との連携もこの機能を使って実装できます。
- 開発者体験の向上: 状態管理やキャッシュの無効化といった、多くの開発者が直面する課題を自動的に解決します。これにより、開発者は煩雑なバックエンドの管理から解放され、アプリケーションの機能開発に集中できます。
Convex.dev、便利だけど大丈夫? 採用前に知っておきたい3つの懸念点
最近、リアルタイムなアプリケーション開発で注目されているConvex.dev。TypeScriptでの開発体験の良さや、リアルタイム同期の簡単さから多くの開発者を魅了しています。
しかし、新しいサービスを採用する際には、その便利さの裏にあるリスクも理解しておく必要があります。ここでは、Convexを検討する際に注意すべき3つの懸念点について解説します。
1. サービスの継続性と資金力
Convexは有力なベンチャーキャピタルから大規模な資金を調達しており、現時点では安定しているように見えます。しかし、スタートアップである以上、将来的にサービスが終了するリスクはゼロではありません。
もしConvexがサービスを終了した場合、アプリケーションのバックエンドをすべて別のサービスに移行する必要が出てきます。これは時間と労力がかかる大きな作業となるため、プロジェクトの長期的な運用を考える際は、このリスクを考慮しておく必要があります。
2. ベンダーロックインのリスク
ConvexのTypeScriptに特化した開発体験は非常に魅力的ですが、その強力なエコシステムに依存することで、他のサービスへの移行が難しくなるベンダーロックインのリスクがあります。
FirebaseやAWS Amplifyも同様のリスクはありますが、ConvexはTypeScriptの関数としてバックエンドのロジックが深く組み込まれるため、移行のハードルが高くなる可能性があります。データベースも組み込まれているので、選択の余地はない。重要なデータは別の場所にもバックアップを取るなど、リスクを軽減する対策を検討しておくと良いでしょう。
3. 言語の制約
Convexの強みはTypeScriptにありますが、これは同時に制約でもあります。
PythonやGoなど、TypeScript以外の言語でバックエンドのロジックを書きたい場合、Convexは選択肢になりません。プロジェクトの技術スタックがTypeScriptに限定されるため、多様な言語を使いたい開発者にとってはデメリットとなる可能性があります。
まとめ
Convexは、リアルタイムアプリケーションを迅速に、かつ型安全に開発したいチームにとって、非常に強力なツールです。しかし、その強力な開発体験と引き換えに、サービスの継続性や言語の制約といったリスクも存在します。これらの懸念点を理解した上で、自社のプロジェクトの要件と照らし合わせて採用を判断することが重要です。
チュートリアルの実行(チャットアプリの実装)
ドキュメントはこちら
チュートリアルソースの取得&インストール
% git clone https://github.com/get-convex/convex-tutorial.git

% cd convex-tutorial
% npm install
Devサーバー実行
% npm run dev

> convex-tutorial@0.0.0 predev
> convex dev --once

? Welcome to Convex! Would you like to login to your account? Start without an account (run Convex locally)
Let's set up your first project.
? Choose a name: convex-tutorial
This command, `npx convex dev`, will run your Convex backend locally and update it with the function you write in the `convex/` directory.
Use `npx convex dashboard` to view and interact with your project from a web UI.
Use `npx convex docs` to read the docs and `npx convex help` to see other commands.
? Continue? Yes
✔ Downloaded Convex backend binary
✔ Downloaded Convex dashboard
✔ Started running a deployment locally at http://127.0.0.1:3210 and saved its:
    name as CONVEX_DEPLOYMENT to .env.local
    URL as VITE_CONVEX_URL to .env.local
Run `npx convex login` at any time to create an account and link this deployment.

Write your Convex functions in convex/
Give us feedback at https://convex.dev/community or support@convex.dev
View the Convex dashboard at http://127.0.0.1:6790/?d=anonymous-convex-tutorial

✔ 10:23:40 Convex functions ready! (147.01ms)

> convex-tutorial@0.0.0 dev
> npm-run-all --parallel dev:backend dev:frontend

> convex-tutorial@0.0.0 dev:backend
> convex dev

> convex-tutorial@0.0.0 dev:frontend
> vite --open

  VITE v5.4.19  ready in 389 ms

  ➜  Local:   http://localhost:5173/
  ➜  Network: use --host to expose
  ➜  press h + enter to show help
✔ Started running a deployment locally at http://127.0.0.1:3210 and saved its name as CONVEX_DEPLOYMENT to .env.local
Run `npx convex login` at any time to create an account and link this deployment.

Write your Convex functions in convex/
Give us feedback at https://convex.dev/community or support@convex.dev
View the Convex dashboard at http://127.0.0.1:6790/?d=anonymous-convex-tutorial

✔ 10:23:41 Convex functions ready! (88.36ms)- http://localhost:5173/ にConvex chatアプリが起動する
- http://127.0.0.1:6790/?d=anonymous-convex-tutorial にダッシュボードが起動する
- ./convexフォルダにバックエンドが自動で生成される
Convexの仕組みのイメージ
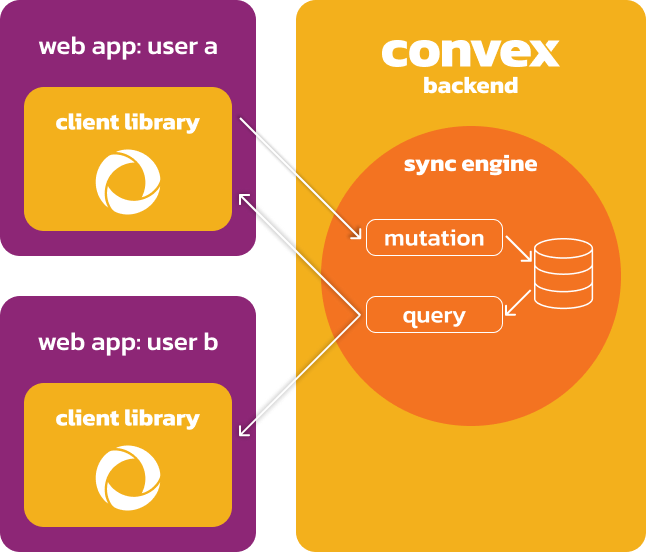
(出典: https://docs.convex.dev/tutorial#how-convex-works)
mutationの作成
ミューテーション関数は、Convexのデータベースを更新するためのTypeScript関数です。これらの関数はすべて、データベースのトランザクションとして実行されます。そのため、関数内のすべての変更はまとめてコミットされるか、何もコミットされないかのどちらかになります。簡単に言えば、ミューテーション関数を使うと、複数のデータベース操作を「一つのまとまり」として扱うことができ、データの整合性を確実に保つことができます。
- 以下のファイルを追加する
- バックエンド関数
sendMessageは、公開APIとして利用できます。 - この関数はデータベースのトランザクションとして実行されるため、例外が発生した場合はすべての変更が自動的にロールバックされます。
- 関数が受け取る引数(
userとbodyの2つの文字列)の型と値が保証されます。 ctx.db.insertは、新しいメッセージドキュメントを指定されたテーブルに挿入するコマンドです。
- バックエンド関数
import { mutation } from "./_generated/server";
import { v } from "convex/values";

export const sendMessage = mutation({
  args: {
    user: v.string(),
    body: v.string(),
  },
  handler: async (ctx, args) => {
    console.log("This TypeScript function is running on the server.");
    await ctx.db.insert("messages", {
      user: args.user,
      body: args.body,
    });
  },
});- 以下にsendMessageを組み込む
- 関数の取得:
useMutation(api.chat.sendMessage)を使って、バックエンドのsendMessage関数を呼び出すための「ハンドル(参照)」をフロントエンドで取得します。 - 関数の実行: 取得した
sendMessage関数に、必要な引数(例:{ user: NAME, body: newMessageText })を渡して呼び出します。これにより、バックエンドでデータベースの更新が実行されます。
- 関数の取得:
import { useEffect, useState } from "react";
import { faker } from "@faker-js/faker";
// ADDED HERE 1 !!!
import { useMutation } from "convex/react";
import { api } from "../convex/_generated/api";
// For demo purposes. In a real app, you'd have real user data.
const NAME = getOrSetFakeName();
export default function App() {
const messages = [
{ _id: "1", user: "Alice", body: "Good morning!" },
{ _id: "2", user: NAME, body: "Beautiful sunrise today" },
];
// ADDED HERE 1 !!!
const sendMessage = useMutation(api.chat.sendMessage);
const [newMessageText, setNewMessageText] = useState("");
useEffect(() => {
// Make sure scrollTo works on button click in Chrome
setTimeout(() => {
window.scrollTo({ top: document.body.scrollHeight, behavior: "smooth" });
}, 0);
}, [messages]);
return (
<main className="chat">
<header>
<h1>Convex Chat</h1>
<p>
Connected as <strong>{NAME}</strong>
</p>
</header>
{messages?.map((message) => (
<article
key={message._id}
className={message.user === NAME ? "message-mine" : ""}
>
<div>{message.user}</div>
<p>{message.body}</p>
</article>
))}
<form
onSubmit={async (e) => {
e.preventDefault();
await sendMessage({ user: NAME, body: newMessageText }); // ADDED HERE 1 !!!
alert("Mutation not implemented yet");
setNewMessageText("");
}}
>
<input
value={newMessageText}
onChange={async (e) => {
const text = e.target.value;
setNewMessageText(text);
}}
placeholder="Write a message…"
autoFocus
/>
<button type="submit" disabled={!newMessageText}>
Send
</button>
</form>
</main>
);
}
function getOrSetFakeName() {
const NAME_KEY = "tutorial_name";
const name = sessionStorage.getItem(NAME_KEY);
if (!name) {
const newName = faker.person.firstName();
sessionStorage.setItem(NAME_KEY, newName);
return newName;
}
return name;
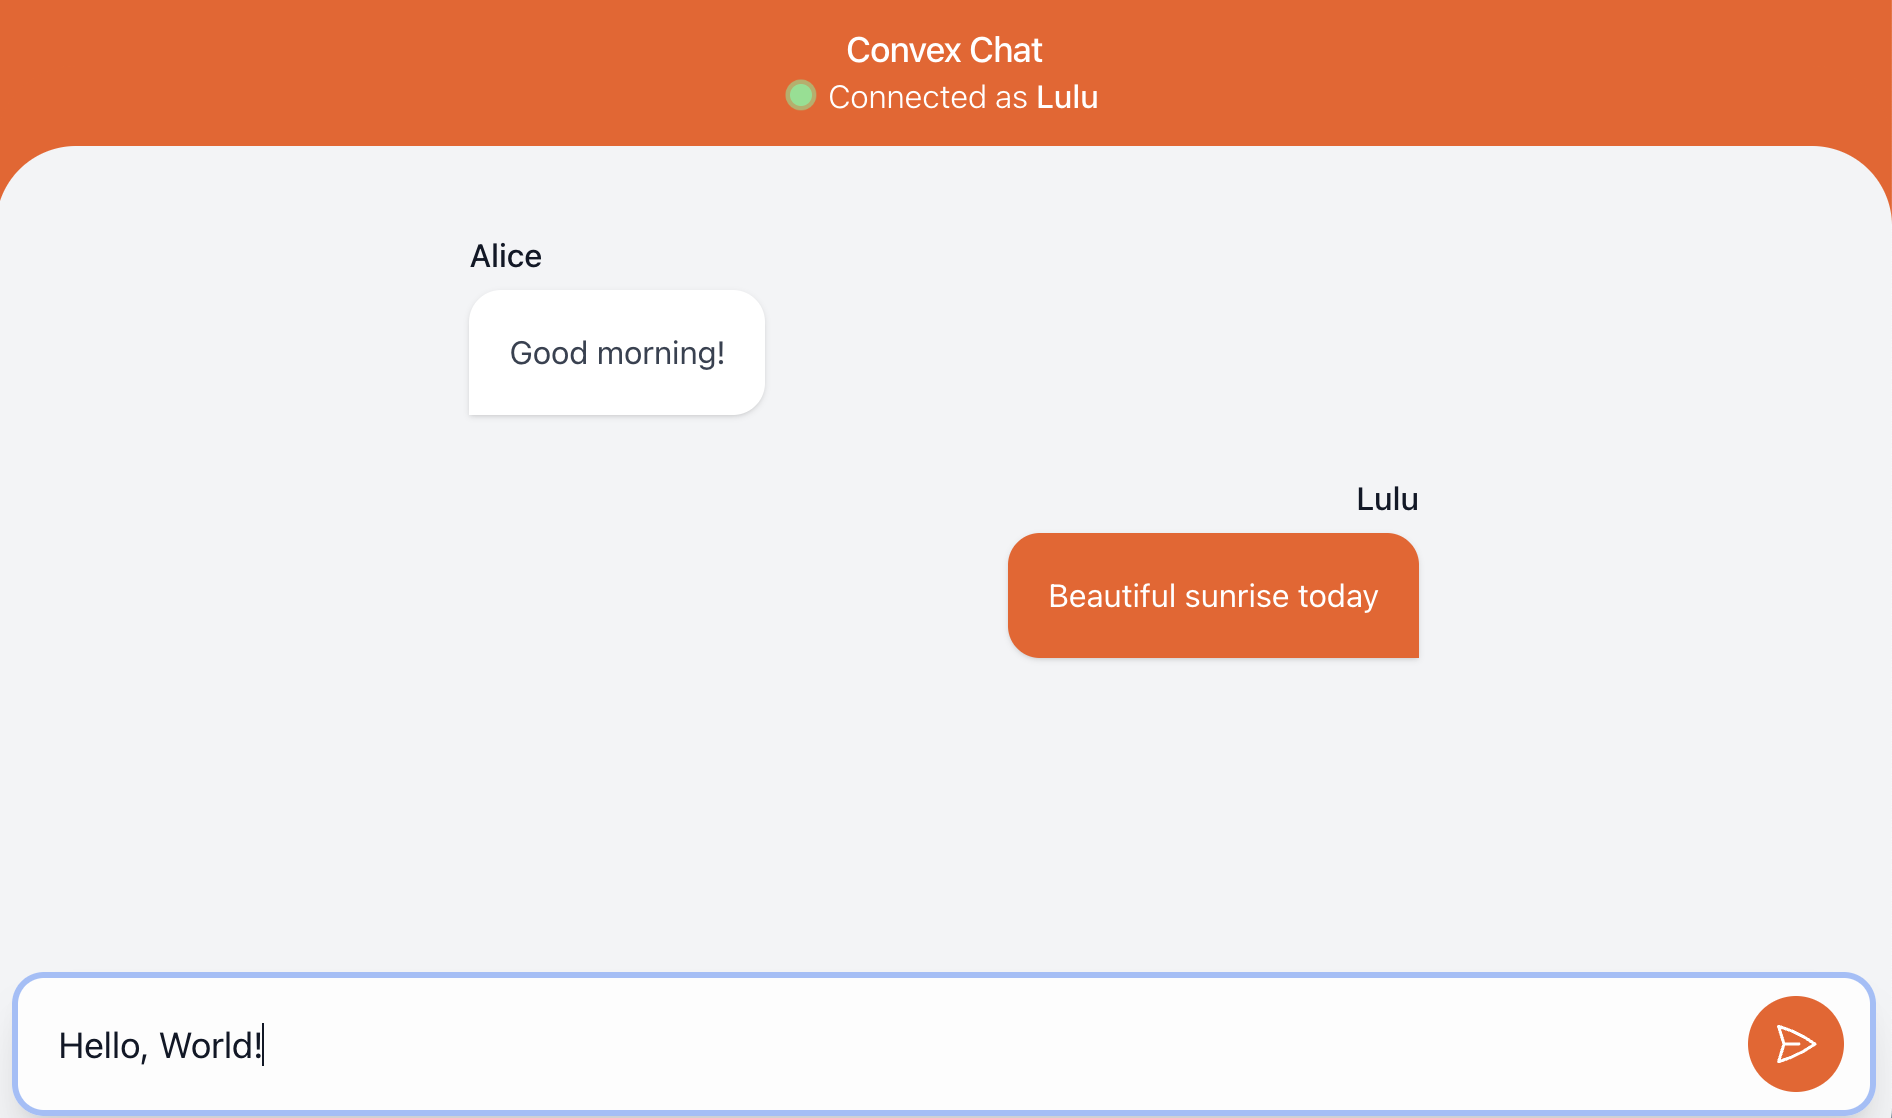
}Chatアプリで、メッセージを送信する
ダッシュボードアプリで、messagesテーブルが作成され、データが格納される
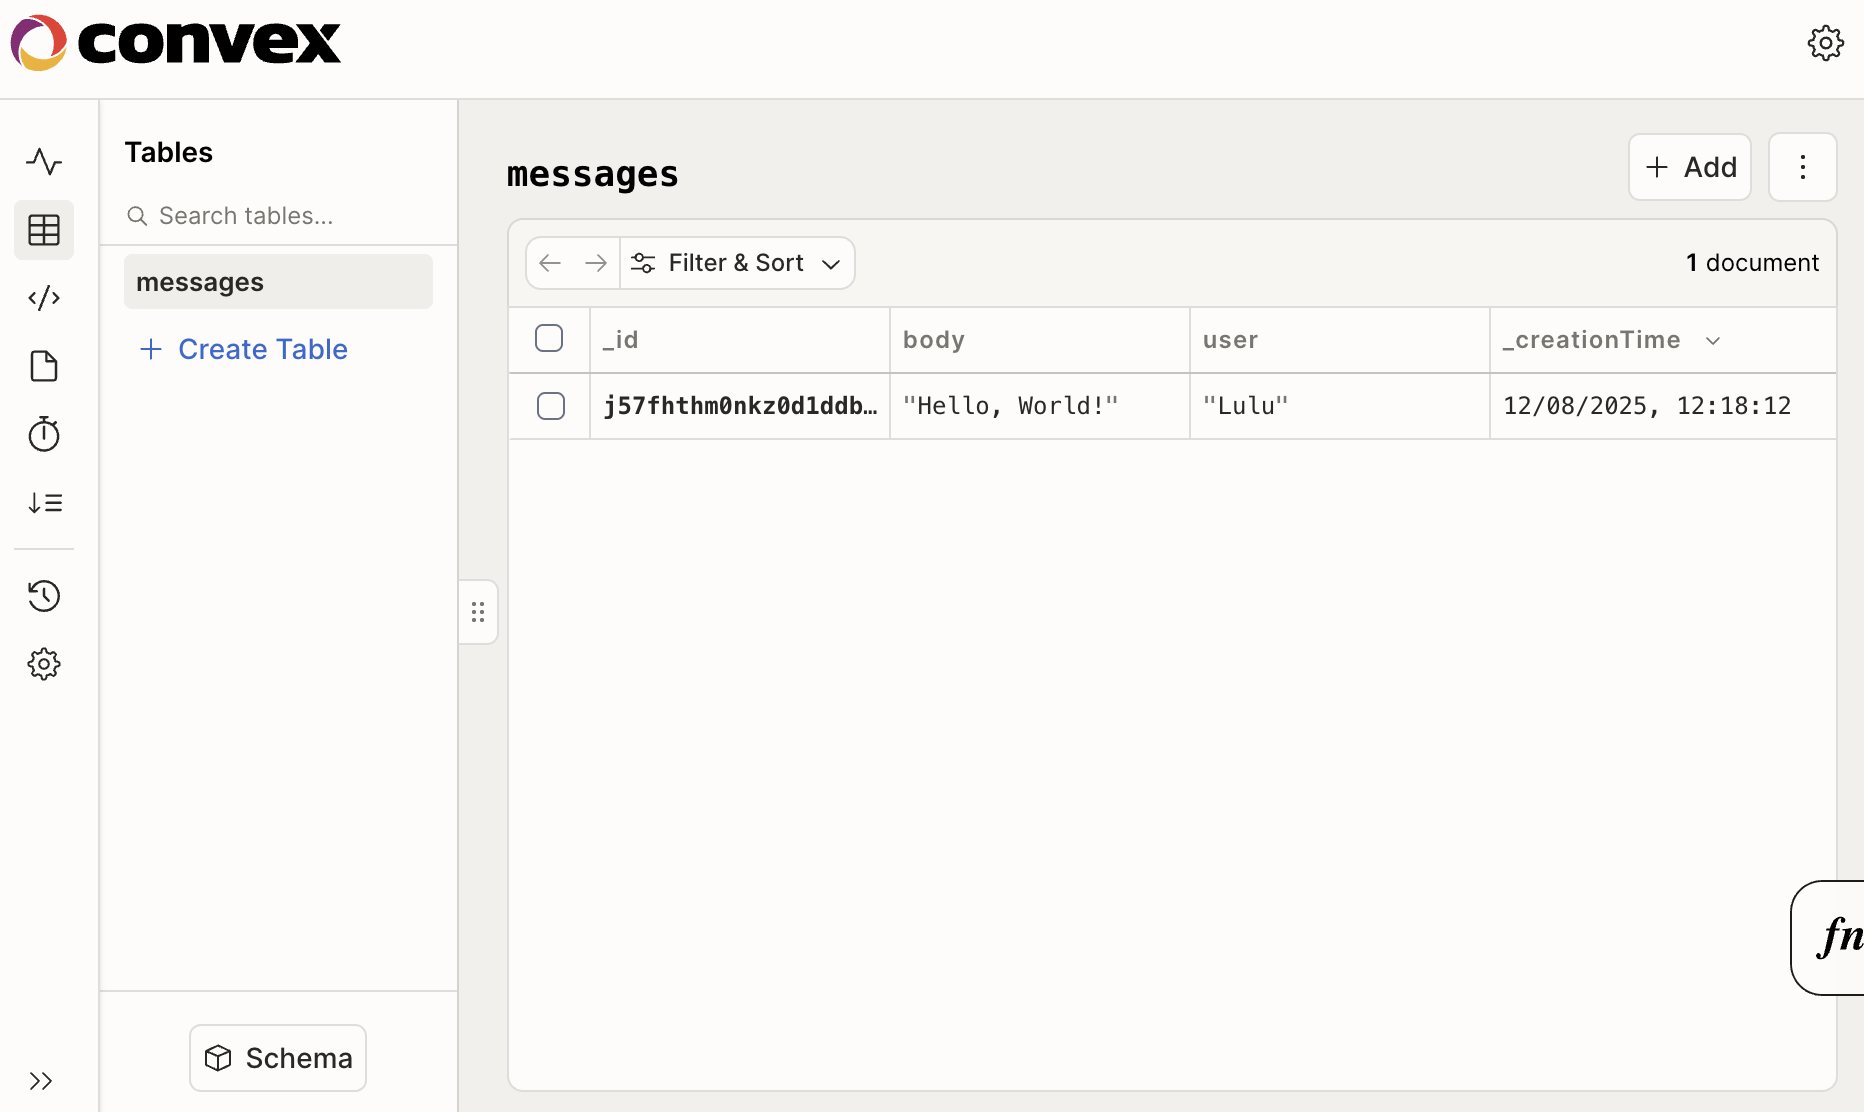
- Convexは、最初のメッセージが送信されたときに自動的に
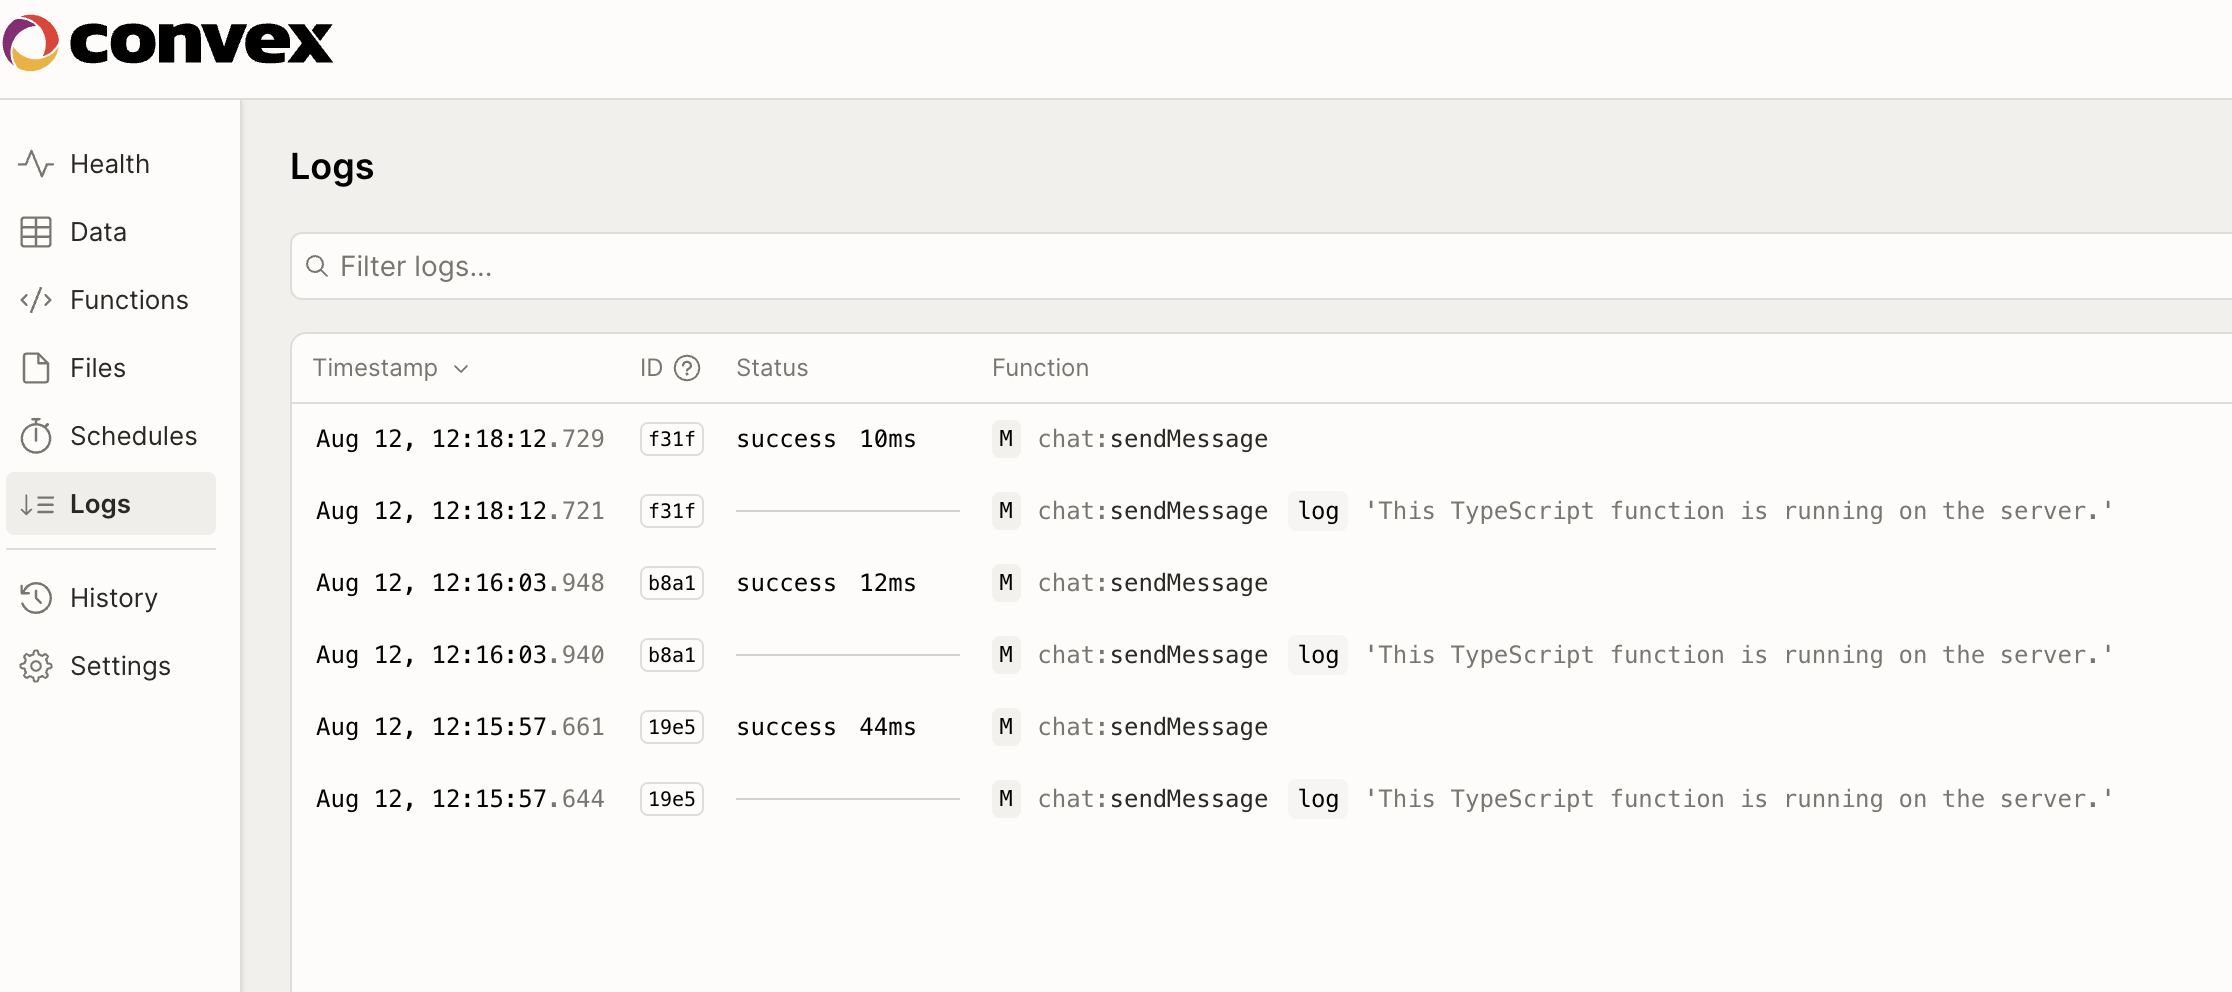
messagesテーブルを作成しました。 - ダッシュボードのLogs画面では、console.log(“This TypeScript function is running on the server.”);を含むミューテーション関数の呼び出しをすべて確認できます。
Queryの作成
- getMessages関数の追加
- messagesテーブルから最新の50レコード取得
- 逆に並べ替えて、返す
import { query, mutation } from "./_generated/server";
import { v } from "convex/values";

export const sendMessage = mutation({
  args: {
    user: v.string(),
    body: v.string(),
  },
  handler: async (ctx, args) => {
    console.log("This TypeScript function is running on the server.");
    await ctx.db.insert("messages", {
      user: args.user,
      body: args.body,
    });
  },
});

// ADDED HERE 2 !!!
export const getMessages = query({
  args: {},
  handler: async (ctx) => {
    // Get most recent messages first
    const messages = await ctx.db.query("messages").order("desc").take(50);
    // Reverse the list so that it's in a chronological order.
    return messages.reverse();
  },
});useQuery行にて、getMessages関数を購読するようにConvexクライアントライブラリに指示しています。表示すべき新しいメッセージがあるたびに、クエリ関数が自動的に再実行されます。その結果はconst messages変数に格納され、ReactがUIコンポーネントを再描画して最新のメッセージを表示します。
import { useEffect, useState } from "react";
import { faker } from "@faker-js/faker";

// ADDED HERE 1 !!!
import { useQuery, useMutation } from "convex/react";
import { api } from "../convex/_generated/api";

// For demo purposes. In a real app, you'd have real user data.
const NAME = getOrSetFakeName();

export default function App() {
  /*
  const messages = [
    { _id: "1", user: "Alice", body: "Good morning!" },
    { _id: "2", user: NAME, body: "Beautiful sunrise today" },
  ];
  */

  // ADDED HERE 2 !!!
  const messages = useQuery(api.chat.getMessages);

  // ADDED HERE 1 !!!
  const sendMessage = useMutation(api.chat.sendMessage);

  const [newMessageText, setNewMessageText] = useState("");

  useEffect(() => {
    // Make sure scrollTo works on button click in Chrome
    setTimeout(() => {
      window.scrollTo({ top: document.body.scrollHeight, behavior: "smooth" });
    }, 0);
  }, [messages]);

  return (
    <main className="chat">
      <header>
        <h1>Convex Chat</h1>
        <p>
          Connected as <strong>{NAME}</strong>
        </p>
      </header>
      {messages?.map((message) => (
        <article
          key={message._id}
          className={message.user === NAME ? "message-mine" : ""}
        >
          <div>{message.user}</div>

          <p>{message.body}</p>
        </article>
      ))}
      <form
        onSubmit={async (e) => {
          e.preventDefault();
          await sendMessage({ user: NAME, body: newMessageText }); // ADDED HERE 1 !!!

          alert("Mutation not implemented yet");
          setNewMessageText("");
        }}
      >
        <input
          value={newMessageText}
          onChange={async (e) => {
            const text = e.target.value;
            setNewMessageText(text);
          }}
          placeholder="Write a message…"
          autoFocus
        />
        <button type="submit" disabled={!newMessageText}>
          Send
        </button>
      </form>
    </main>
  );
}

function getOrSetFakeName() {
  const NAME_KEY = "tutorial_name";
  const name = sessionStorage.getItem(NAME_KEY);
  if (!name) {
    const newName = faker.person.firstName();
    sessionStorage.setItem(NAME_KEY, newName);
    return newName;
  }
  return name;
}- 2つのチャットアプリを起動すると、メッセージのやりとりができる
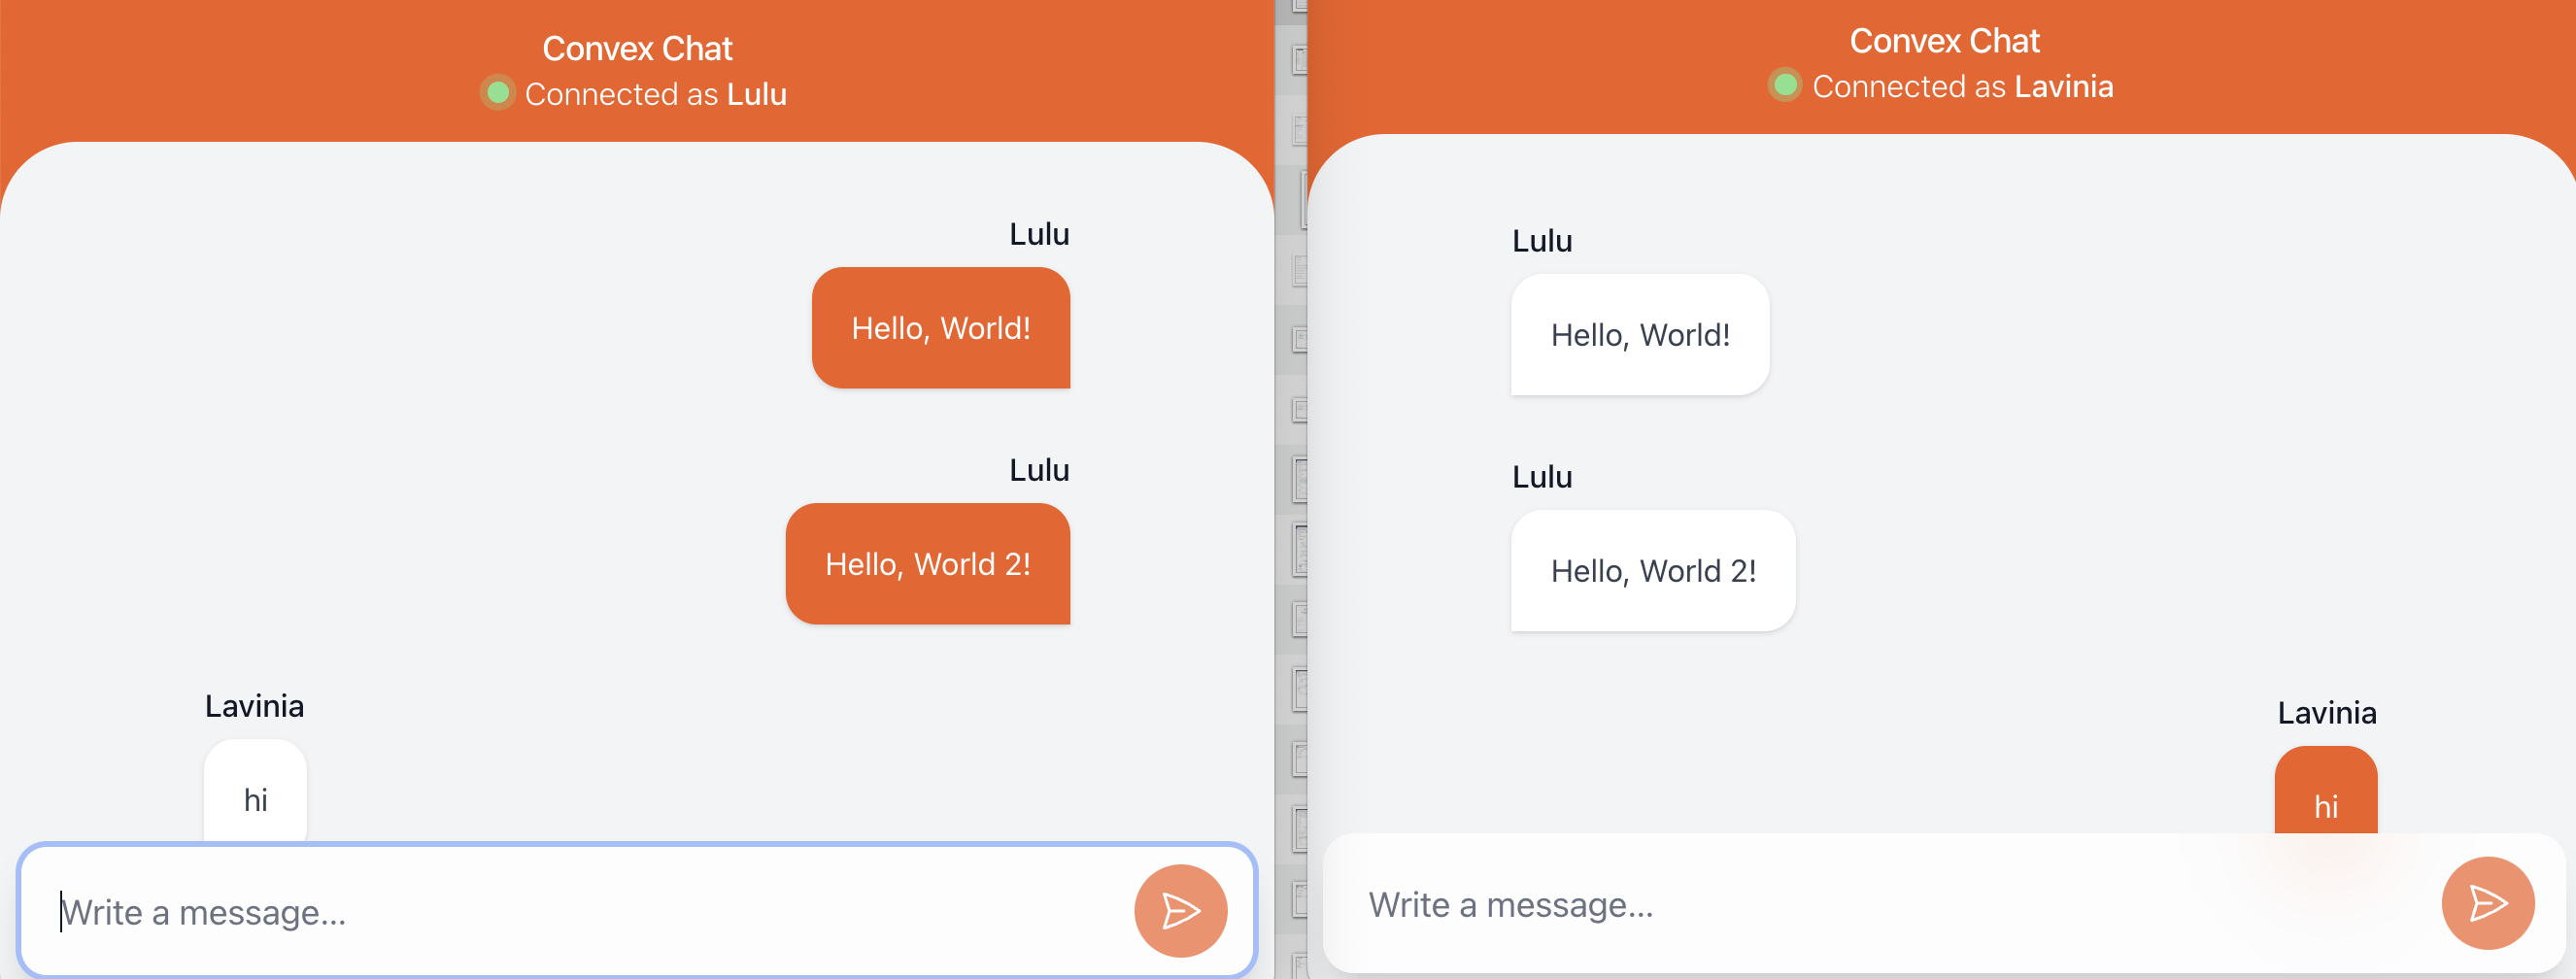
このように、少ないコードで、簡単なチャットアプリが作成できました。UIはサンプルが提供していますが、DB周りのところは、ほとんど考える必要がなさそうです。他のフレームワークにくらべて、洗練されていると感じました。